How to Repair a Worn Spot on a Raft
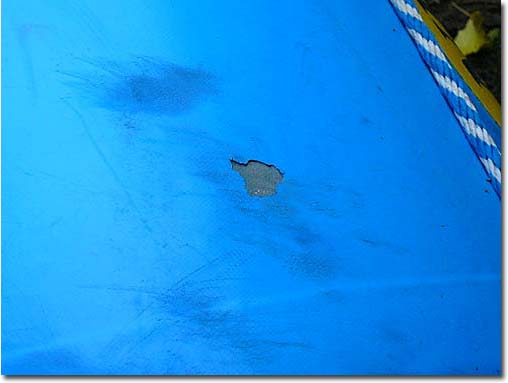
Over time, the wear and tear of boating can cause worn spots on the boat's fabric, sometimes becoming a “scrim shot.” A scrim shot is a place on the material of an inflatable boat where the outer coating has been worn off, exposing the woven supportive fabric or “scrim.” The inner coating is still intact, so you’re not leaking air. This sort of damage is probably most common on the bottom of your boat, from scraping over obstacles. You can also get them on the sides and tops of the tubes from hitting stuff and from frame wear. The object of this repair is to protect that woven fabric from further wear.
Earlier this year, as I was cleaning up my E-150 raft after a trip, I noticed some places on the frame wear patches where my frame had rubbed off the outer coating. Of course, this is an extra layer of material, over the air-holding chamber, but I wanted to protect it anyway.
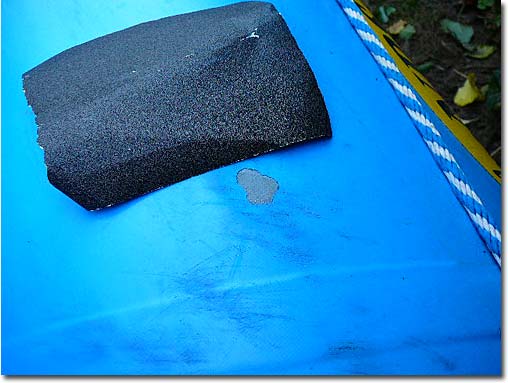
First, I took some sandpaper and buffed the coating right around the damaged areas. I also removed a bit of coating that had lifted away from the fabric, so I was back to solidly connected coating. I then cleaned the area with some rubbing alcohol. For this job, any solvent that can remove oils or other contaminants will work.
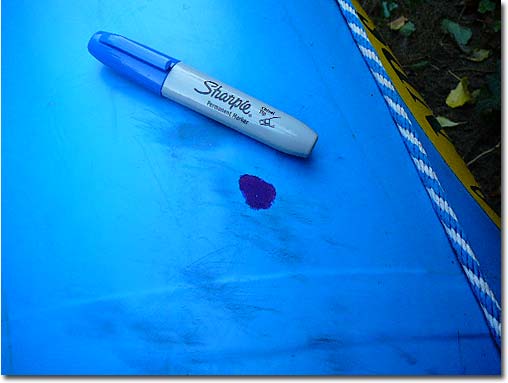
Then, I got to thinking… always a dangerous thing for me. One time when Bill Parks, NRS founder and President, was talking to me about this type of repair, he told me about the trick of using a permanent marker to color the scrim the same color as the outer coating. I thought, "What the hey, I’ll give it a go." I took a blue marker and doctored up the threads. Hmm, not exactly the same shade, but what the hey. This would probably work great when you’ve got a black coating.
After the marker ink was good and dry, it was time for the final step. I took a table knife out of my kitchen box (don’t worry guys, I cleaned it off well afterwards) and spread some Aquaseal Adhesive over the scrim and onto the coating around the spot. When first spreading the adhesive, it may not look smooth, but gravity will take over and self-level the adhesive for a smooth finish. Keep the repair area level overnight, or 10-14 hours, for a complete cure. Another application method is to mix the Aquaseal with some Cotol Accelerator to thin it. Then, you can even apply it with a brush. Using Cotol also shortens the cure time to about two hours.

Aquaseal is a polyurethane (PU) adhesive. PU’s outstanding properties for a repair like this is that it dries clear, stays flexible and is extremely abrasion resistant. Aquaseal is a tool that belongs in your repair kit. One important use for boaters is attaching latex gaskets to dry wear. It also adheres to neoprene, nylon, vinyl (PVC), GORE-TEX and other laminates, many fabrics, foams, composites, and many plastics.
Now, this is a great, simple repair method where the damaged area is NOT leaking air. If you’ve got a leak, even a pinhole in a boat, put on a patch.
Simple repair, easy to do-it-yourself. Just part of the “Joy of Fixing Your Own Gear.”
Boat Often, Boat Safe!
-Clyde
The next time you use Aquaseal try heating the tube first in a cup of hot water. This thins out the glue which allows better penetration. A smoother, thinner patch cures faster. This way you can avoid having to mix in a thinner on the river. I carry a couple of cheap plastic knives so there is nothing to clean up. Although not necessary, it also helps if the area to be repaired can be warmed from the sun first.
Scott Brunk
Hello Clyde,
I enjoy reading your lines on repairing your gear. Apparently, we have both grown up during times when self-repair was the only way we had.
My grandfather once told me while building skirting around a mobile home (back in the early 70s), "If you don't have time to do it RIGHT now… when are you going to find time later?" Those words have stayed with me for over 40 years. It may take longer than you had planned to complete your project, but will be more than worth it in the long run.
I am curious about your Stanley thermos. If you turn it upside down, on the bottom it will be stamped with the year it was built. I have two that were manufactured in "72". They haven't had near the use that you have described but are still working well.
I will be watching for your tips on repairs to come. While the youngins are away from the river the next few months, we will be in the repair mode getting ready for another great float trip.
Thanks for sharing,
Marco
Thank you, Scott and Marco, for writing. One of the real benefits of my job is getting to communicate with fellow boaters. I learn a lot from you.
Scott’s input on using Aquaseal for repairs is spot on. Heating the adhesive definitely improves spreading. And a thinner application will certainly cure faster. Just remember, for a really quick cure, mixing in Cotol (~ one part Cotol to three-four parts Aquaseal) is the way to go.
I got a kick out of Marco’s email. The way I’ve heard the quote is “You can’t find the time to do it right the first time, but you can always find time to do it over again.” Either way, it’s wise words to live by. Taking a bit of extra time at first saves a lot of time in the long run.
His mention of the thermos reminds me of a fun story. Before I bought my thermos, I worked on a wildlife refuge in Oklahoma. One of the maintenance men, running a bulldozer missed his stainless thermos and walked back to find it. It had tumbled off the dozer and the track had run over the bottom half, reducing it to a pint capacity. But it still kept his coffee hot.
Thinking he could get a new thermos, he sent it back to the manufacturer with his testimonial. He never heard back from the company. Not only did he not get a new thermos, he lost his pint one! Needless to say, he was pissed.
Below are some tips from the manufacturer on using Aquaseal.
Aquaseal Instructions
- Clean damaged area with Cotol-240™ Cure Accelerator/Precleaner or solvent (paint thinner, nail polish remover or similar).
- Trim loose threads. Non-fabric surfaces should be roughened with sandpaper, then cleaned. Apply Aquaseal® to surfaces directly from tube or with knife or flat stick. Keep repair level overnight. Avoid contact with other surfaces.
- Most repairs reach full strength overnight (10-14 hours). Allow longer for thickest repairs. For fastest cure (2 hours or less), mix in Cotol-240.
- HOLES AND TEARS: Create backing with removable tape. Fill void and 1/4" beyond edge with Aquaseal. Remove tape after full cure.
- SEAMS: Apply 1/16" thick bead overlapping seams edges by at least 1/4". Apply with slight pressure to saturate fabric surfaces.
- HIGH WEAR AREAS: Apply thin coat with knife for flexible abrasion resistance.
- WARNING: FULLY CURED AQUASEAL IS SLIPPERY WHEN WET. For added traction on footwear, sprinkle sand on uncured Aquaseal 1/2 hour after applying.
- CLEAN UP: To remove Aquaseal from hands, buff with cloth soaked in paint thinner, nail polish remover or 99% isopropyl alcohol.
- STORAGE: Advance contents to tube neck. Wipe clean and cap. Keep in cool, dry place; for extended life, place in freezer. To thaw or for easier-flowing contents, soak tube in warm water for 15 minutes.
What is Aquaseal?
When cured (dry) Aquaseal is a thick, clear, elastic urethane rubber.
How does Aquaseal work?
Aquaseal is applied to a hole or tear and allowed to cure over a period of hours (usually 8–12).
When applied, Aquaseal cures by reacting with humidity in the air. It doesn’t “dry” the way other glues do. It changes from a thick liquid to a thick, flexible, elastic rubber.
Once cured, it’s permanent. The repair will generally last the life of the item.
'%3e%3cg id='Final-Copy-2_2_' transform='translate(1275.000000, 200.000000)'%3e%3cpath class='st0' d='M7.4,12.8h6.8l3.1-11.6H7.4C4.2,1.2,1.6,3.8,1.6,7S4.2,12.8,7.4,12.8z'/%3e%3c/g%3e%3c/g%3e%3c/g%3e%3cg id='final---dec.11-2020'%3e%3cg id='_x30_208-our-toggle' transform='translate(-1275.000000, -200.000000)'%3e%3cg id='Final-Copy-2' transform='translate(1275.000000, 200.000000)'%3e%3cpath class='st1' d='M22.6,0H7.4c-3.9,0-7,3.1-7,7s3.1,7,7,7h15.2c3.9,0,7-3.1,7-7S26.4,0,22.6,0z M1.6,7c0-3.2,2.6-5.8,5.8-5.8 h9.9l-3.1,11.6H7.4C4.2,12.8,1.6,10.2,1.6,7z'/%3e%3cpath id='x' class='st2' d='M24.6,4c0.2,0.2,0.2,0.6,0,0.8l0,0L22.5,7l2.2,2.2c0.2,0.2,0.2,0.6,0,0.8c-0.2,0.2-0.6,0.2-0.8,0 l0,0l-2.2-2.2L19.5,10c-0.2,0.2-0.6,0.2-0.8,0c-0.2-0.2-0.2-0.6,0-0.8l0,0L20.8,7l-2.2-2.2c-0.2-0.2-0.2-0.6,0-0.8 c0.2-0.2,0.6-0.2,0.8,0l0,0l2.2,2.2L23.8,4C24,3.8,24.4,3.8,24.6,4z'/%3e%3cpath id='y' class='st3' d='M12.7,4.1c0.2,0.2,0.3,0.6,0.1,0.8l0,0L8.6,9.8C8.5,9.9,8.4,10,8.3,10c-0.2,0.1-0.5,0.1-0.7-0.1l0,0 L5.4,7.7c-0.2-0.2-0.2-0.6,0-0.8c0.2-0.2,0.6-0.2,0.8,0l0,0L8,8.6l3.8-4.5C12,3.9,12.4,3.9,12.7,4.1z'/%3e%3c/g%3e%3c/g%3e%3c/g%3e%3c/g%3e%3c/svg%3e) Your Privacy Choices
Your Privacy Choices NRS Gift Card: Always Fits, Always Wanted


