How to Maintain an NRS Super Pump
The NRS Super Pump is a reliable dual-action pump used to inflate and deflate all types of watercraft, from rafts to inflatable kayaks to stand-up paddleboards. In just a few simple steps, you’ll be able to troubleshoot and address common issues with your pump and keep it functioning well season after season.
How the Super Pump Works
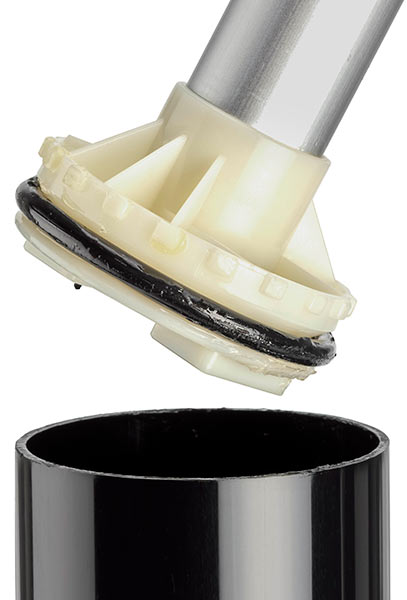
The Super Pump has a single internal air chamber that houses a piston. The piston uses a rubber O-ring around its base to create an air-tight seal, allowing the pump to move air effectively.
There is a red plug tethered to the top cap of the pump. When installed, it makes the pump dual-action, meaning it will push air on both the upstroke and the downstroke (as opposed to only the downstroke when the red plug is not installed). There is another rubber O-ring in the top cap that facilitates the dual-action mode.
The dual-action mode is ideal for moving a lot of air in a low-pressure setting, such as raft and kayak tubes. However, when using the Super Pump to inflate high-pressure inflatables such as SUPs and drop-stitch floors, it’s best to remove the red plug to make pumping easier.
Troubleshooting O-Ring and Barrel Issues
There are two rubber O-rings in the Super Pump, a larger one around the base of the piston and a smaller one in the top cap that facilitates the dual-action mode. The barrel is lubricated to help keep the pump action smooth.
If the pump isn’t pushing air correctly, it’s usually caused by either a dislodged O-ring in the top cap or around the piston, or the inner barrel is dry and needs to be lubricated. Thankfully, these issues are very easy to troubleshoot.
If either O-ring sustains damage, or becomes dislodged, the pump will no longer move air effectively. Likewise, if the inside of the barrel is dry, it can create excess friction and adversely affect the pump action.
To inspect the O-rings and inner barrel, disassemble the pump and follow these steps.
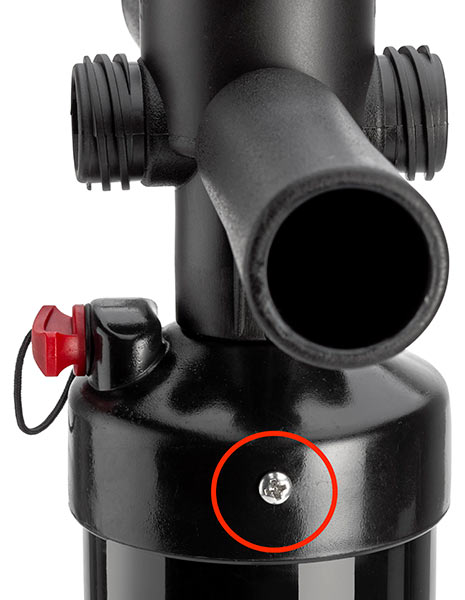
- Using a Phillips-head screwdriver, remove the two screws on either side of the top cap.
- Set the pump on the floor, then pull up on the handle until the piston separates from the barrel.
- Tip: use your feet to secure the main body of the pump on the ground as you pull up on the handle.
- Inspect the bottom of the piston. You should see a groove where the larger O-ring is seated.
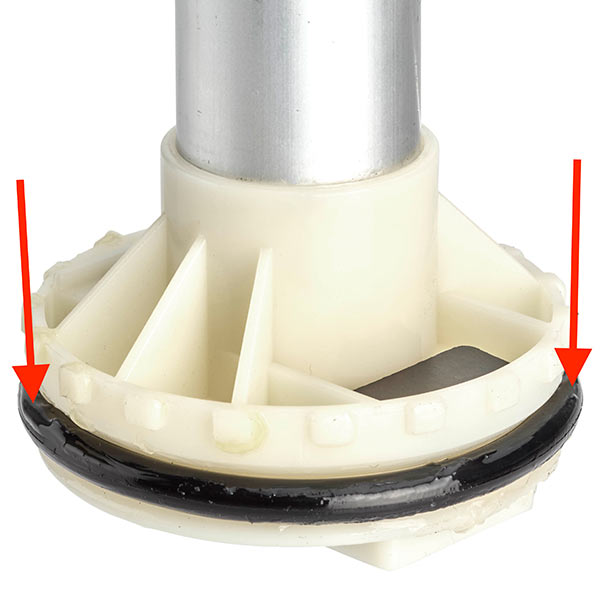
Tip: if the O-ring has been dislodged, it may be loose at the bottom of the barrel. - Inspect the O-ring, checking for signs of damage or debris. Clean any dirt or debris with a clean, dry cloth.
- If the O-ring is undamaged, reposition it within the groove at the bottom of the piston.
- If the O-ring is dry, apply a small amount of white lithium grease.
- If the O-ring is damaged or torn, contact our customer experience team to request a replacement.
If this resolves the issue, skip to step 11. Otherwise, continue with the following steps to inspect the smaller O-ring in the top cap.
- Disassemble the top cap. Start by removing the pump handle, which is screwed onto the piston shaft. Rotate counter-clockwise to remove it.
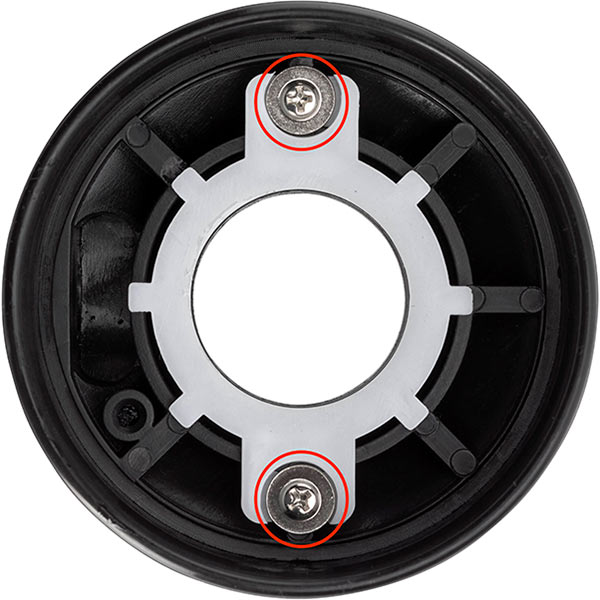
- Using a Phillips-head screwdriver, remove the two screws in the white plastic retainer on the underside of the top cap and locate the O-ring.
- Inspect the O-ring, checking for any signs of damage.
- If the O-ring is dry, apply a small amount of white lithium grease.
- If the O-ring is damaged or torn, contact our customer experience team to request a replacement.
- If the O-ring is undamaged, reposition it within the groove of the white plastic retainer and reattach the white plastic retainer to the top cap using the two screws.
- With the top cap reassembled, slide it on the piston shaft. Reattach the pump handle, rotating clockwise until tight.
- Inspect the inner wall of the barrel. Clean any dirt or debris with a clean, dry cloth. If the inner wall is dry, a small amount of white lithium grease may be applied to aid operation.
- Tip: due to the smaller diameter barrel, consider wrapping the cloth around a long-handled brush.
- Once all the components are back in place, reassemble the pump. Start by positioning the bottom of the piston above the opening of the pump barrel, then push the piston down and into the barrel.
Tip: inserting the piston at a slight angle can make this step much easier. - Once the piston is fully inserted, replace the two screws on either side of the top cap.
- Once the pump has been reassembled, ensure the lubricant is dispersed evenly by giving the pump a few complete strokes.
- Your pump is now good to go!
Tip: periodically check the inner barrel of the pump to ensure it’s clean and well lubricated. For average use, once or twice per year is sufficient. For heavy use, consider inspecting the pump monthly.
Other Potential Issues
Sometimes things break and can’t be fixed at home. Fortunately, NRS stocks a variety of replacement parts for the Super Pump including:
- Inflation hose
- Larger piston O-ring
- Smaller top cap O-ring
- Pressure gauge
- Valve adapter set
Please contact our customer experience team to request replacements for any of these parts.
 NRS Gift Card: Always Fits, Always Wanted


