How to Maintain, Stretch, and Replace Dry Wear Gaskets
If you haven’t discovered the joys of staying dry when you’re boating in colder weather, you’re in for a treat. Modern technical fabrics that block water from soaking through while allowing your perspiration to exit make for comfortable boating.
However, the fabric alone doesn’t keep you dry. Whether it’s a dry top, dry pants or a full dry suit, there also has to be something at the openings to keep water out. Dry suits have waterproof entry and relief zippers. The other openings, at neck, wrists and ankles, typically have some type of gasket to make the seal.
Article Contents:
What are Dry Wear Gaskets?
Gaskets are made from one of two materials: latex or neoprene. For the driest seal, you can’t beat latex. The sturdy, flexible material forms a great watertight barrier. Our latex gaskets and socks are made from the highest quality natural rubber latex. This natural latex is formed from the milky sap of the Para rubber tree (Hevea brasiliensis). The manufacturing process makes a seamless product with an even thickness that’s also smooth and soft against the skin. It has very good tensile strength and is tear, puncture and abrasion-resistant.
Some boaters prefer neoprene gaskets, such as the ones we use in our semi-dry wear. Neoprene is even stretchier than latex, which makes these gaskets inherently more comfortable against the skin. However, this extra stretch keeps them from sealing as well as latex (hence referring to these garments as semi-dry). Nevertheless, for many boaters they are more than adequate for their type of boating.
How to Take Care of Dry Wear Gaskets
Gaskets made of latex rubber are susceptible to drying out over time. Regular treatments with silicone grease can greatly increase the life of your gaskets. We recommend coating your gaskets every 4–6 weeks when not in use and every time you get off the water.
- Temperature: Storage temperatures should be kept below 80°F and the material stored away from heaters.
- Humidity: Humid storage conditions should be avoided.
- Direct light or artificial UV light: Articles should be protected from prolonged exposure to light, in particular direct sunlight and artificial light with a high UV content.
- Metals: Avoid contact with copper and copper-containing alloys.
- Ozone: One of the worst places to store dry wear with latex gaskets is in the back of a car where high levels of ozone are created locally, especially in hot weather.
- Care should be taken to wash out the gaskets after use in cold water and towel dry. Avoid getting sunscreen on your gaskets; ingredients in some of them will damage the latex.
How to Stretch a Latex Gasket
A neck gasket that fits snugly enough to keep water out can be uncomfortable if wearing a dry top or dry suit is new for you. Most people get used to it and find the gasket stretches adequately on its own. Don’t go with your first impression; wear the garment for a while to determine if you really do have a problem. However, if you’re turning blue and wanting to send the damn thing back, it’s time to take action.
In this video, we go over the how-to of fixing the problem of a too-tight gasket.
Due to your cookie choices, we cannot show you this content. Adjust your settings?
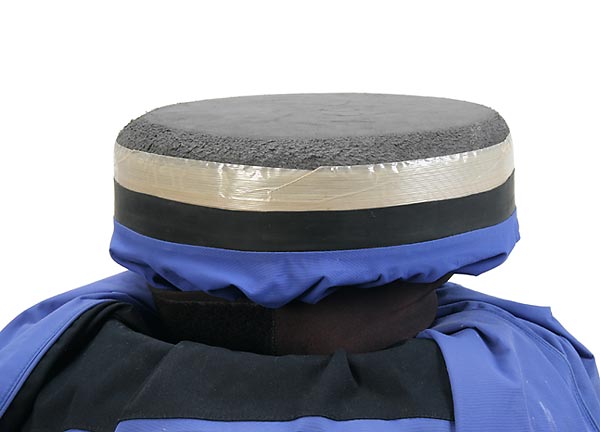
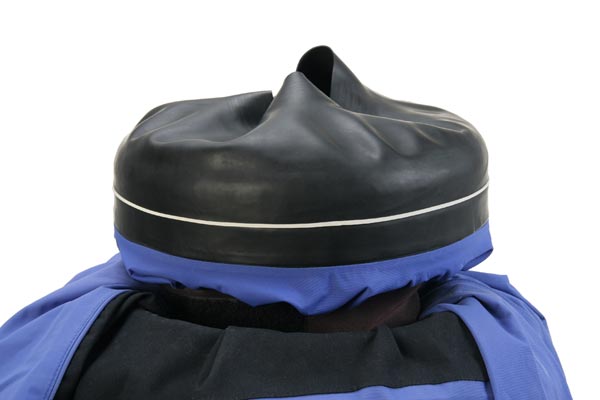
- First, find the circumference of your neck using a cloth measuring tape or a string. Use that measurement to find a cylindrical object, like a cooking pot, coffee can or vase, that’s a little larger than your neck. Be sure the object doesn’t have any sharp or rough edges that can damage the gasket.
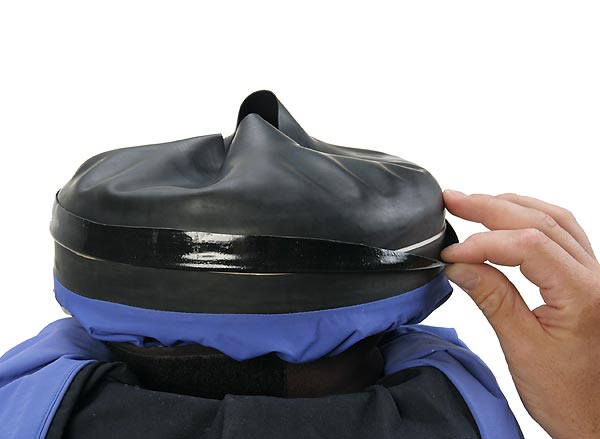
- Peel the protective overcuff away from the gasket. Slide the chosen object into the gasket and let it stay in there overnight. Try the garment on again to see if you find it more comfortable.
- If it’s still too tight, repeat the process with the same form. Still didn’t do the trick? You can pick a slightly larger form and let that sit overnight.
As a last resort, it’s possible to trim the gasket for a better fit.
Trimming Latex Gaskets: To Cut or Not to Cut
Some folks still find the gasket too tight and want to trim it to a wider opening. Proceed with caution! An improper cut can cause a split and tear in the gasket. If you must cut a latex gasket, stretch it over a round object and use a very sharp blade, like a precision knife, to make the cut. Cut between two of the ridges on the gasket creating a smooth line parallel to the ridges. Remember—even a downward nick will cause a tear.
Note: Gaskets are not covered under warranty. Thankfully, modern latex gaskets are tough and durable. However, there is a good likelihood that at some point during the life of a dry wear garment, you’ll have to replace one or more of the gaskets.
How to Perform an Emergency Field Repair
Gaskets and socks on dry wear are tough, but not indestructible. Boating with a tear in the latex can let water pour inside the garment if you swim, with possibly disastrous consequences.
In this video, we show you how to make a field repair with Tear-Aid - Type A. It’s stretchy, durable, waterproof and sticks to just about everything. It belongs in every repair kit.
Due to your cookie choices, we cannot show you this content. Adjust your settings?
Try to catch and fix the tear as early as possible; even the smallest nick will soon spread all the way through the gasket.
- Cut out the patch so that it extends at least one-half inch away from the tear. Round the corners on any patch; a sharp corner is more likely to catch and peel up.
- Clean the area around the tear, inside and out, with alcohol or another solvent and let it dry. Align the edges of the tear together.
- Peel up one half of the paper backing on the patch and carefully roll the Tear-Aid onto the gasket. Use your fingers to firmly press the patch into place. Then peel the rest of the backing away and press the patch onto the inside of the gasket.
There’s no cure time; you’re ready to go right away. Tear-Aid is stretchy, but not as stretchy as the latex. Use care when donning the gasket; once you have it on, check to be sure the patch is still firmly in place.
This fix will get you through your trip—just remember to replace the gasket once you get home!
Gasket Replacement Instructions
Learn how to replace and care for the latex gaskets on your dry wear with these detailed step-by-step instructions.
Due to your cookie choices, we cannot show you this content. Adjust your settings?
Materials Needed
- Dry wear gaskets
- Gear Aid Aquaseal Flexible Repair Adhesive
- Gear Aid Aquaseal FD Accelerator & Cleaner (optional, but recommended)
- Roller rasp
- Pro roller
- Sandpaper
- Glossy nylon strapping tape
- Masking tape
- Razor blade and/or scissors
- Form
- Strong rubber bands
- Clean, lint-free rag
- Popsicle stick, small bristle brush or plastic knife
Step-by-Step Instructions
Safety First: Always work in a well-ventilated area. Latex gloves, eye protection and a respirator are highly recommended.
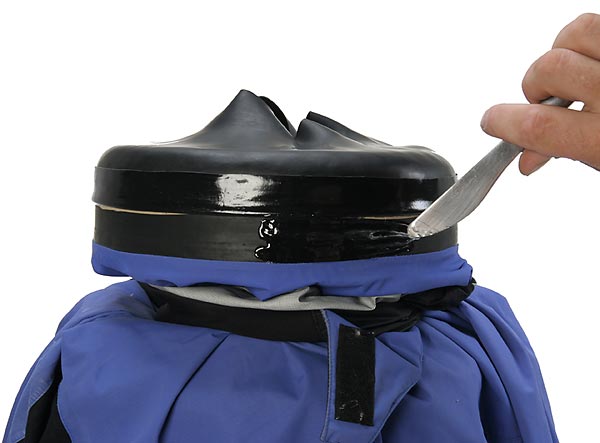
Step 1: Inspect the Old Gasket | If the existing gasket is in good condition, the new gasket can be adhered to it. Make sure to leave approximately 1" of old gasket material above the fabric of the dry wear. This will leave plenty of the existing latex to adhere the new gasket to.
Note: Do not cut into the actual material/fabric of the dry wear; only the latex should be cut.
Completely remove the gasket if it’s dry and cracking or is not completely attached to the dry wear. Using a hair dryer to apply heat to the old gasket will weaken the adhesive allowing the gasket to be peeled off. You do not need to clean off the old glue; the new glue layer can be applied over the old.
Step 2: Insert a Form Into the Dry Wear | Forms can be coffee cans, pots or plastic containers. A form can also be made by cutting Minicell foam to the size and shape you need. Before inserting the form, cover it with glossy tape (nylon strapping tape) to prevent the Aquaseal from sticking to the form. The form should fit tightly inside. In the event that a tight fit is hard to achieve, increase the diameter of the form using glossy tape or a different form.
Note: We do not recommend using cone-shaped forms because they can cause the gasket to slide during the repair.
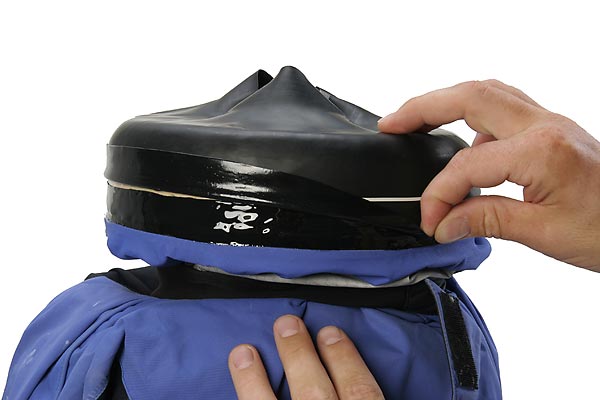
Step 3: Position the Dry Wear | The dry wear should be positioned so that 1–2" of the form is exposed above the edge of the gasket material.
Step 4: Stretch the New Gasket Over the Form | The new gasket should be stretched over the form and pulled down far enough to completely overlap the old gasket, or to where the old gasket used to be. The shiny strip at the bottom of one side of the new gasket is the gluing surface and is placed inside against the old gasket. Place a rubber band over the gasket about halfway down the form.
Note: Leave the rubber band in place until the gasket repair is completed.
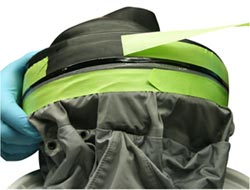
Step 5: Fold the New Gasket Over Itself | Fold the new gasket over itself, and the rubber band, enough to expose the suit’s old gasket underneath.
Step 6: Buff the Old Gasket | Buff the old gasket with 150 or 180 grit wet/dry sandpaper. Rough up the area to be glued until the latex loses its shine. Clean with Cotol or acetone, using a clean lint-free rag.
Note: Many gaskets now come with a shiny polyurethane strip, which is the gluing surface. This strip does not need to be buffed. Simply clean the strip lightly with Cotol or acetone and continue with the repair.
Step 7: Apply a Thin Layer of Aquaseal | From this point, there are different techniques you can use in gluing on your new gasket.
- Mix Cotol with the Aquaseal, 3 parts Aquaseal to 1 part Cotol. Cotol speeds up the cure time to approximately two hours, depending on conditions. Aquaseal is a moisture-curing adhesive, so low humidity slows the cure. We recommend this technique because the mixture is a brushable consistency and the faster cure time lets it act more like a contact adhesive. In the repair shop we use 1/2" chip brushes to apply the glue. Don’t go beyond the 3:1 mixture; too much Cotol can lead to a poor glue bond.
- Apply Aquaseal without Cotol. It’s a thick gel, so you’ll need to spread it with something like a butter knife or popsicle stick.
Whichever method you’re using, spread a thin layer of adhesive over both surfaces.
Step 8: Fold the New Gasket Down | If you’re using Cotol, wait about 30 minutes before folding the new gasket down. This wait allows the glue to partially cure and become tacky. Test by touching it with a knuckle. It should feel tacky, but no glue will come off on your knuckle. Use the roller to press the surfaces together and remove any air bubbles.
If using straight Aquaseal, there are two different ways to approach this step.
- Carefully fold the gasket down right away. Use the roller to press the surfaces together and remove any air bubbles. You’ll want to put some more rubber bands over the glued area to keep the surfaces together until the glue cures.
- Alternatively, you can let the glue cure overnight. Then quickly wipe the surfaces with a rag soaked in acetone. This will create a tacky surface. Carefully fold the gasket down and use the roller to press the surfaces together and remove any air bubbles.
Step 9: Monitor Your Repair | When using straight Aquaseal and folding the gasket down right away, for the first hour check the repair occasionally to make sure the gasket does not slip and that no wrinkles or air pockets develop. Slipping can occur when the form is too big or too small, so pay close attention to how the gasket is sitting during the early curing process.

Note: The optimal climate for repairs is above 60°F and below 50% humidity. Curing time may vary with climate conditions.
When using Cotol with the Aquaseal, full cure usually occurs within two hours, but it’s safer to wait four hours before putting stress on the bond. With straight Aquaseal, full cure can take 8–12 hours.
Step 10 (optional): “Seam-Line” | One way to ensure your gasket repair will stay for a longer period of time is to add a “seam-line” about 1/4" to 1/2" wide that will span the gap between the edge of the new gasket and the cloth of your dry suit. Edges are the enemy when it comes to glue. We recommend going through the same steps of mechanical prep (sandpaper), chemical cleaning and an additional step of taping off the “seam-line” area.
- Mechanically prep the lowest 1/4" to 1/2" of your new gasket where it meets the dry suit. Going over will not be a big deal, and being neat is not necessary during this step.
- After you have roughed up the material, use some acetone or Cotol to clean up this area. These steps are very much the same as prepping the old gasket. The additional step of taping off your area will help ensure the end product looks nice and clean. Not entirely necessary, but it does add a nice touch.
- Making sure you stay a consistent 1/4" above the seam between the new gasket and the dry suit, wrap some masking tape all the way around the neck gasket.
- Repeat this procedure 1/4" below the seam on the cloth side of your dry suit. When you are done you will have a nice 1/4" to 1/2" piece of dry suit showing through the tape that shows the seam of the new gasket with the dry suit.
- Coat this seam with glue, immediately remove the tape (it can be very difficult/impossible to remove after the glue has dried) and wait 24 hours.
There is also a seam on the inside of the gasket; you can repeat this procedure by turning that portion of the dry suit inside out, and starting all over. This step is not necessary but it will help your repair last a lot longer.
Questions?
If you’d like your dry wear gaskets replaced professionally, please visit our Repairs Department webpage for information and pricing.
For any additional questions on caring for your dry wear gaskets, please contact us.
 NRS Gift Card: Always Fits, Always Wanted


