
How to Inflate and Deflate Your NRS Packraft
Packrafts open the door to a whole new world of paddling possibilities with their easy and convenient packability and lightweight designs. Here are some best practices for inflating and deflating your packraft, whether you’re at home or about to hit the water.
Before You Inflate: Where and How Are You Paddling?
How you inflate your packraft depends on where you’re starting and how far you’re traveling before you paddle.
- Near your vehicle: If you have an electric pump—battery-powered or vehicle-powered—or a barrel-style pump (such as the NRS Super 2 or a K-Pump), do most or all of your initial inflation at the car. It’s the fastest way to get on the water.
- Hiking or biking in: If you’re traveling farther from your vehicle or prioritizing minimal weight, the inflation bag is the right starting tool for inflation—but it is not necessarily the final step.
Regardless of method, wrap or pad any hard items inside the tubes—such as spare paddles, cooking gear, or fire pans—before inflating. This helps prevent damage while paddling.
Inflating the Packraft
Unroll your packraft on a clean, abrasion-free surface and locate the valve, which is typically positioned near the stern. Remove the valve cover to expose the inner portion of the valve. You should see a spring-loaded plunger that opens and closes the valve when pressed.
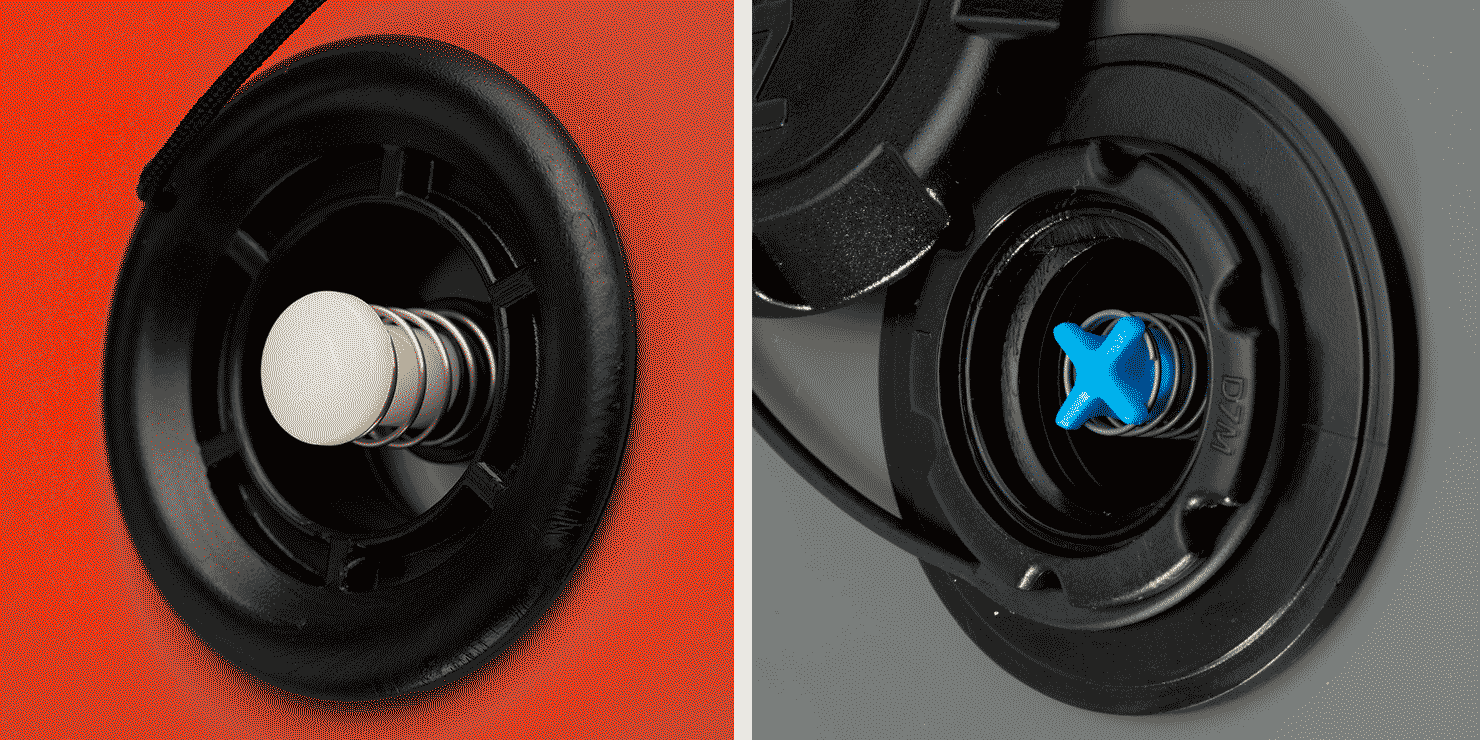
To Inflate With a Pump:
- Make sure the plunger is in its closed position (popped up). This allows air to pass into the packraft but won’t allow air back out.
- Connect your pump to the valve and begin pumping. The maximum ideal air pressure is 1.5 psi.
To Inflate With the Inflation Bag:
- Make sure the plunger is in its open position (pushed down).
- Attach the inflation bag to the valve, then open the bag so it can fill with air.
- Capture that air by quickly closing the bag and squeezing it gently to push the air into the packraft. Tip: roll the bag from the top down a couple of times to help secure the air in the bag. Repeat until the packraft is mostly inflated.
- After your last bag roll, disconnect the bag from the valve and quickly press the plunger so it pops back up into its closed position.
- It is strongly recommended to use a small hand pump, such as the K-Pump Mini, to bring the packraft up to full inflation. If you are prioritizing ultralight travel, the included blow tube can be used to add air, but it is difficult to reach the desired 1.5 psi and will likely require more frequent stops to re-temper the tubes.
Reattach the valve cover, stash the inflation bag and you’re ready to paddle!
Important: The inflation bag typically brings the packraft to about 80–90% taut, not 80–90% of its ideal (1.5 psi) pressure. A pump is strongly suggested to reach proper performance pressure.

Inflation Troubleshooting Tips:
- If your packraft isn’t holding air, double-check your valve position.
- If your valve is in the open position, check to see if there is any sand or grit obstructing the valve.
- If air is going in but not holding, check your packraft for leaks or damage.
- If your valve opens during pumping with a pump, reduce the amount of pressure in each pump.
Tempering Your Packraft (For Best Performance)
Tempering is the process of adjusting your packraft’s air pressure as it transitions from warm air to cold water. As the air inside the boat cools, it contracts, which reduces internal pressure. Because packrafts operate at relatively low pressure, even small temperature changes can noticeably affect performance.
Initial Tempering
The goal of initial tempering is to expose the entire packraft to the water temperature before you start paddling. This helps stabilize internal air pressure and prevents the boat from feeling soft or underinflated shortly after launch.
- Inflate your packraft to full operating pressure on shore.
- In shallow, knee-deep water, roll the packraft from top to bottom so both surfaces get fully wet. (Think of spinning it like a crocodile rolls. 🐊)
- This cools the fabric evenly and begins equalizing internal pressure.
- Return to shore and re-pump the packraft to pressure.
Wrinkles in the bow or stern, or tubes that feel easily compressible by hand, indicate more air is needed for best performance.
On-Water Adjustments
Paddle for 5–20 minutes, then pull over and reassess. Cold water often continues to reduce internal pressure after launch. Most paddlers will need to add air at least once more before the boat stabilizes.
In all but the most ultralight scenarios, a pump is the best tool for reaching and maintaining proper pressure. Inflation bags and mouth tubes are useful backups, but they are not ideal for achieving performance pressure.
Note: This process is standard across packrafts from all manufacturers and is especially important in cold-water regions where packrafting is popular.
Deflating the Packraft
When it’s time to deflate the packraft, there are two options.
Deflate Your Packraft With the Valve:
- To deflate the packraft using the valve, simply remove the valve cover and press the plunger into its open position. The packraft will automatically start deflating.
- To speed up deflation, fold or roll the packraft toward the valve.
- Reattach the valve cover once the packraft is fully deflated.
Deflate Using the TIZIP® Zipper:
- Simply unzip the zipper on the stern of the packraft a few inches to deflate the packraft.
- To speed up deflation, fold or roll the packraft toward the zipper.
Once the packraft is fully deflated, you can roll or fold it for transport or hang to dry.
Inflating and Deflating the Packraft Seat
The seats included with NRS Packrafts use the same valves as the packraft’s main chamber. Use the technique listed above to inflate and deflate your packraft’s seat.
Maintaining the Packraft Valve
NRS Packrafts use Bravo or Leafield D7M valves, which work similarly to other spring-loaded valves on rafts and SUPs and are compatible with a variety of pumps. No matter the type, your packraft’s valve will work better and last longer if it’s regularly cleaned and maintained.
After each paddle, check the valve and make sure it’s free and clear of debris. Sand, silt, and dirt can impede the valve's function, cause premature wear, or lead to a leaky valve.
For tips on diagnosing a leaky valve, check out our article on finding and fixing valve leaks noted in the “related articles” section below.
Storing Your Packraft
Like all inflatables, it’s important to make sure your packraft is clean and dry before putting it away for the season. This will help prevent mold and mildew buildup while assuring your packraft is primed and ready to roll as soon as spring hits.
- Rinse your packraft with fresh water and remove any remaining debris with a non-abrasive sponge or a soft towel.
- If your packraft has a TIZIP stern closure, take care to keep sand, dust, and debris out of the zipper teeth, and follow the instructions provided with the supplied lubricant.
- Give the packraft a quick wipe-down with a dry towel and let it sit in a ventilated area for a few hours for the remaining moisture to evaporate.
- Once it’s completely dry, proceed to roll, fold, or hang your packraft in a cool and dry place away from direct sunlight.
Note: avoid leaving your packraft or packraft seat fully inflated for extended periods of time when not actively in use on the water. Long exposure to the sun and high temperatures can increase air pressure in packraft seats, leading to overinflation. Overinflation can damage seams or worse, pop the seat. We suggest bleeding off air pressure or fully deflating in these conditions.
 NRS Gift Card: Always Fits, Always Wanted


