Kayaking for Beginners: Basic Skills, Safety and Gear
If you’re new to kayaking, or looking to get back into it after some time away, it’s a great idea to get familiar with the fundamentals to ensure you have a safe and enjoyable experience.
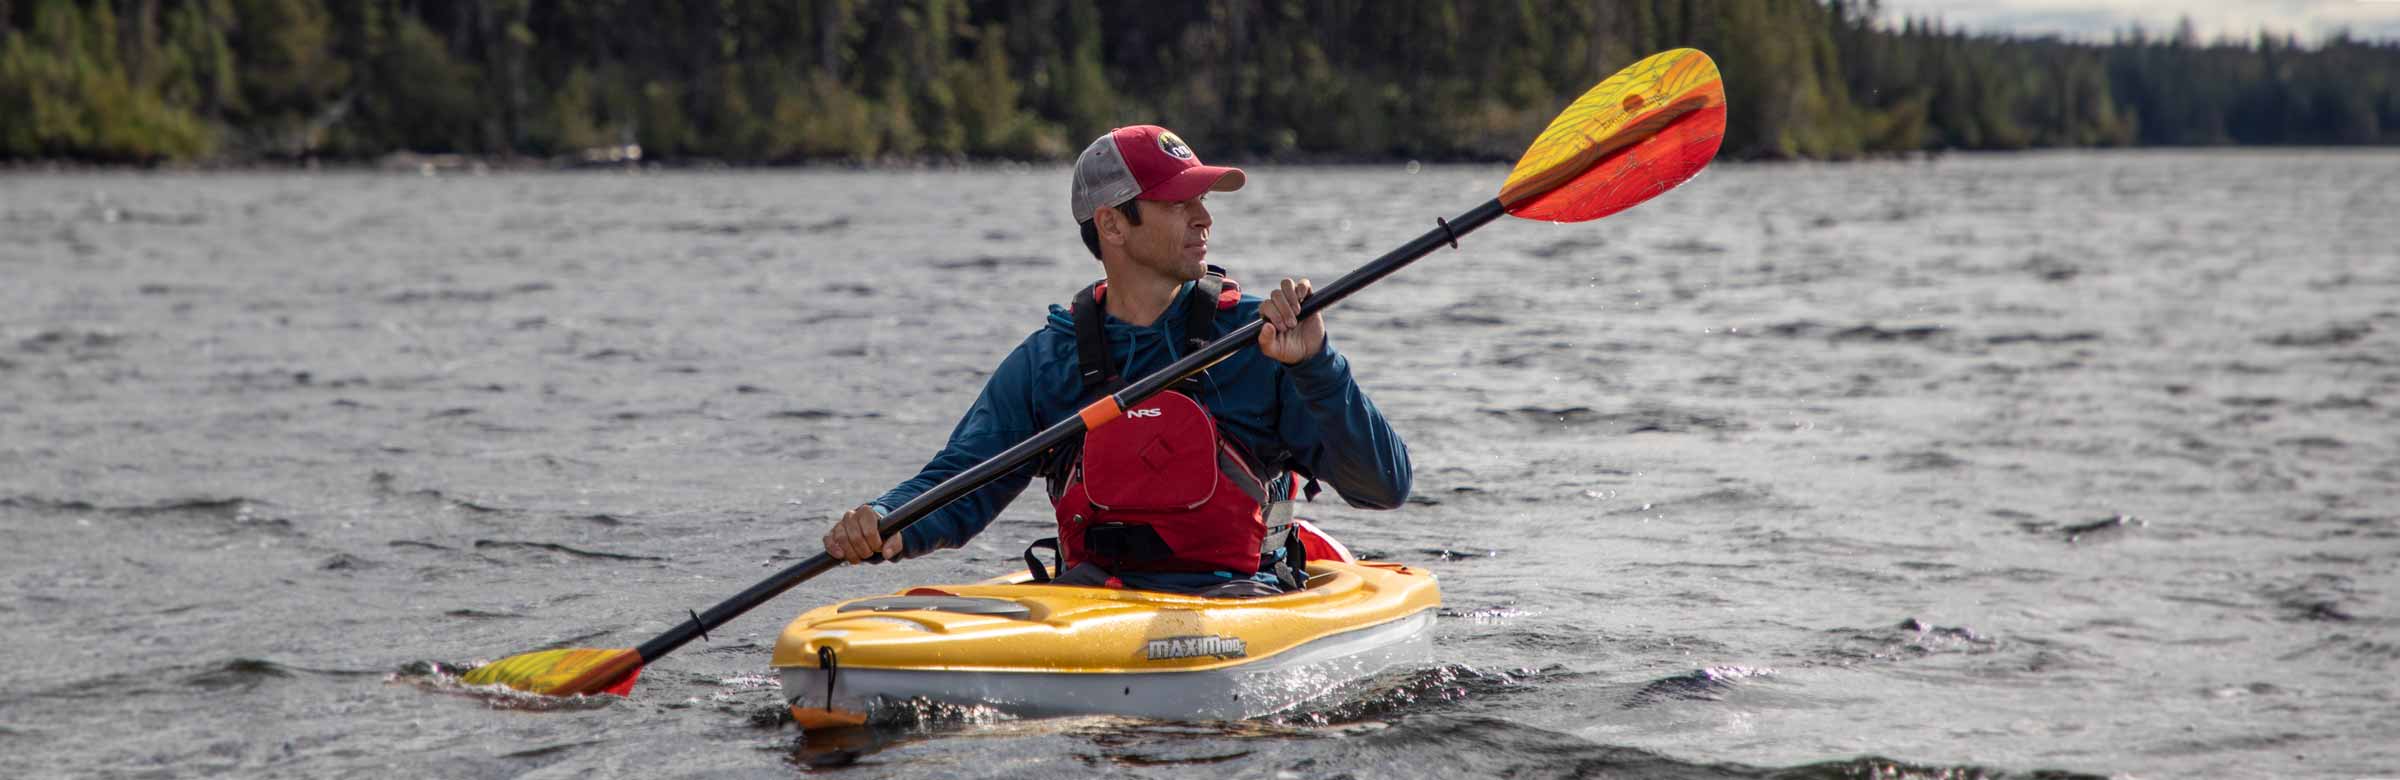
In this series, expert kayaking instructor Ken Whiting breaks down the basic skills you’ll want to practice for a successful and safe time on the water. This beginner’s guide to kayaking covers basic paddling skills, safety tips, life jacket fit, what to wear and other essentials to help you get started.
In This Beginner Kayaking Guide:
Kayaking Basics for Beginners: Three Golden Rules
There are three basic techniques every paddler should know. Mastering these techniques will give you a strong foundation for learning how to roll your kayak and execute advanced paddle strokes.
Due to your cookie choices, we cannot show you this content. Adjust your settings?
Technique #1: A Cooperative Division of the Body
A cooperative division of the body means learning that while your upper body performs one task, your lower body is accomplishing a totally different, but complementary one. So, there’s a distinct separation of your body and its motions at the hips. You see this plainly when rolling a kayak. As your upper body and arms are supplying support and leverage for the roll, your lower body is executing the all-important hip snap.
Technique #2: The Power Position
Maintaining your power position simply means keeping your hands in front of your body and not letting a hand get behind your shoulder, something that can lead to shoulder injury. Think of your arms, chest, and paddle shaft forming a box, and you’ll want to maintain that box when taking any type of paddle stroke. That doesn’t mean you can’t reach back behind you for a stroke, you just have to rotate your whole upper body so your hands stay in front of your chest.
Technique #3: Torso Rotation
Rotating your upper body is referred to as torso rotation. Not only does it keep your shoulders safe, it also lets you transmit the most power to your strokes. Torso rotation is how you get your core upper body muscles involved in your strokes, instead of just your arms. It gives your strokes a lot more power, keeps your shoulders safe and is much less tiring.
How to Do a Forward Stroke in a Kayak
The forward stroke is the most used and most important kayak paddle stroke. Learning to execute it correctly will make your kayaking more effortless and enjoyable.
Due to your cookie choices, we cannot show you this content. Adjust your settings?
In its simplest form, the forward stroke consists of planting the paddle blade at your toes and pulling it through to your hip. By breaking the stroke down into its three parts—the catch, the rotation, and the recovery—we can examine the stroke more carefully and show how it’s done most efficiently.
Step #1: The Catch
The catch is where you plant the blade in the water. Sitting up straight, with a relaxed grip on the paddle, reach out not only with your arms but also with your shoulders to place the blade fully in the water. Reaching with your shoulders involves twisting at the waist. If you’re taking a stroke on the left, you’ll twist your left shoulder forward. Then, as you complete the stroke, you’ll end up with your right shoulder twisted forward. This puts your body’s core muscles into the stroke, along with your arms, and is referred to as torso rotation.
Now, with your right twisted forward, you’re in the perfect ergonomic position to take your next stroke. Imagine you’re planting your paddle in cement when you take a stroke. The paddle shouldn’t really move anywhere; instead, you should really be pulling yourself forward past where it went into the water.
Step #2: Rotation
Your body is like an elastic band—when it’s wound up, it contains a lot of potential energy. Rotation refers to how you use that energy to power your stroke. When done properly, your arms are merely a supplement to the power your torso supplies. As you’re pulling your paddle blade, keep your elbows bent and low. The range of motion of your arms is quite small, as your torso will be doing most of the work. The more vertical you hold the paddle shaft (high angle), the more power you can put into the stroke. This also takes more energy, so holding the paddle less vertical (low angle) serves better for long-distance paddling.
Step #3: Recovery
When the paddle blade reaches your hip, you’re ready for the recovery phase of the forward stroke. Slice the blade up out of the water, plant the other blade in the water, and rotate your torso to complete the next stroke.
Practice keeping your boat as quiet in the water as possible. This gives you the most efficient forward progress. And remember to keep a relaxed grip on the paddle!
How to Get In and Out of a Kayak Safely
Getting in and out of your kayak can be tricky, especially for beginners. Whether it’s a sand or gravel beach, a dock or rocky shoreline, there are great techniques to safely launch and land your boat.
Due to your cookie choices, we cannot show you this content. Adjust your settings?
Launching From a Beach
An ideal spot to launch is a quiet, sandy beach. On the edge of the water, just sit in the boat and use your hands to push yourself out into the deep. If you have a fiberglass or composite kayak that might get damaged by sliding it across the sand, move it out until it’s floating in a few inches of water. Then straddle the boat, lower yourself into the cockpit, and paddle away.
Launching from a Dock
If you’re entering your boat from a dock, pick the lowest spot; the farther the boat is from the top of the dock, the trickier it is to enter the boat. Place your boat parallel to the dock and sit down with your feet in the cockpit. While facing the bow and holding firmly to the dock, lower yourself decisively into the seat. Make sure your paddle is close so you can reach it after getting seated.
Getting out of the kayak is as simple as reversing the above steps. Having someone help stabilize your boat will make these maneuvers easier. They can help either from the dock or from a boat in the water.
Launching from a Rocky Shore
Another situation you may find yourself in is having to enter or exit your boat from a rocky shore. A great assist is to use your paddle as a stabilizing outrigger. With the kayak parallel to shore, place the paddle behind the cockpit with one paddle blade resting on the rocks. Grasp the paddle with both hands behind your back and slide your butt into the seat. You can get out of the boat the same way.
How to Choose a Kayak Life Jacket
The life jacket is your most important on-the-water safety tool. Choose a PFD that fits well so it won’t ride up and will be comfortable enough to wear every time you kayak.
Due to your cookie choices, we cannot show you this content. Adjust your settings?
The technical name for a US Coast Guard Approved life jacket is Personal Flotation Device (PFD). We prefer the term “life jacket” because it really is a life-saving device. Some say the best life jacket is the one you’re wearing; however, you’re much more likely to be wearing a jacket that fits well and is comfortable all day long.
US Coast Guard Approval System
Most kayakers will choose either a US Coast Guard Approved Level 70 or Type V life jacket. Most kayaking jackets are Level 70. Type Vs are typically rescue-specific or high-float jackets.
Learn more about the US Coast Guard approval system and how they’re labeled.
Features to Look For
Kayaking life jackets come with a range of features. Choose one that aligns with how and where you plan to paddle.
Kayaking requires good upper body and arm mobility. Look for a jacket with large arm holes and multiple adjustment straps.
Pockets for stowing gear (and snacks) you want close at hand, and hand warmer pouches are nice.
If you’re kayaking offshore, look for a jacket with a pocket for a marine VHF radio.
If you want to carry a knife on the outside of the jacket, you’ll want a lash tab for securing the sheath.
If your kayak has a high seat back, choose a jacket with either a mesh or thin foam back.
How to Put On a Life Jacket
When first donning the jacket, loosen all the adjustment straps. Cinch the lower adjustment strap below the rib cage—this will anchor the jacket to prevent it from riding up. Move up the jacket, snugly tightening each strap as you go. Last, tighten the shoulder straps. Have someone lift up on the shoulder straps. If the jacket rides up, retighten the lower strap or choose another jacket.
Now that you’ve got a comfortable life jacket, always wear it on the water. It can save your life!
What to Wear Kayaking in Warm and Cold Water
When the water’s warm, the only apparel items you may need—besides your life jacket—are shorts, a top, and some sandals. Easy!
But when the water and weather are cold, you’ll need to make sure you come prepared.
Due to your cookie choices, we cannot show you this content. Adjust your settings?
Cold Water is Dangerous
It’s particularly important to remember that when boating where the air temperature is warm, but the water’s cold, it’s vital to dress for the water temperature. Water conducts heat away from your body some 25-times more quickly than air. Cold water kills—dress accordingly!
Neoprene & Wetsuits
Neoprene garments, like Farmer John or Jane-style wetsuits, and separate pieces like HydroSkin tops and pants, can provide good protection. Remember, these garments must fit skin-snug to minimize water entry and prevent water flushing in and out, pulling heat from your body. Choose neoprene thickness that’s appropriate for the water temperature, and for the possibility of taking a long swim. Adding a splash top and splash pants over neoprene apparel works great to minimize evaporative cooling.
Neoprene gloves and water shoes are important for keeping your extremities warm. Wear neoprene caps and storm hoods to keep your head insulated. For sit-inside kayakers, a good sprayskirt keeps cold water out and your body heat in.
Dry Wear & Semi-Dry Wear
Dry wear is another step up in protection. It allows you to wear insulating base layers underneath to keep warm against the cold. Add and subtract layers to adjust to varying conditions.
A dry top with an inner tunnel can be paired with dry pants for an effective dry system. The ultimate protection is a full dry suit with latex gaskets and integrated dry socks. Yes, they are expensive, but if you want to paddle often in cold-water conditions, it’s a great investment in comfort and safety.
Semi-dry tops and suits have a neoprene neck gasket that is more comfortable for some boaters than latex gaskets. It’s not quite as dry as latex, but these garments can still be a good choice for those not boating in extreme conditions.
Kayak Safety Tips for Beginners
Being safe while touring doesn’t have to be difficult, and following a few commonsense guidelines will help keep you safe as you’re learning kayaking skills.
Due to your cookie choices, we cannot show you this content. Adjust your settings?
Kayak touring is really a very safe outdoor activity; taking some simple precautions can keep it that way. Assuming a conservative and safety-conscious attitude will go a long way in keeping paddling fun and safe.
Alcohol and Paddling Don’t Mix
Alcohol and boating simply do not go together; unfortunately, alcohol is a factor in many boating accidents. First and foremost, always wear a well-fitted life jacket when you’re on the water. Choose jackets designed for kayaking—they free up your arms and have pockets and other features for kayakers.
Some Areas are Safer Than Others
Motor boats and jet skis can be a real hazard. Your kayak is low profile and may not be seen by an inattentive powerboater. Keep your eyes open and avoid areas where there’s a lot of boat traffic.
Choose areas sheltered from wind and waves, especially if you’re still learning the ropes. An ideal location has easy access for launching, lots of places for going ashore, and minimal motorized boat traffic.
Be Aware of Changing Conditions
The ocean and large lakes can be very calm at times, but be aware that these environments are very dynamic, and conditions can change very quickly. Check the weather beforehand if paddling in these areas and keep a close eye on the sky to anticipate a change in conditions.
When paddling close to shore—in warm water and calm conditions—you may not need much more than a good life jacket and a whistle. Before venturing out farther and into more challenging conditions, you need to be better equipped. Please take a rescue safety course and be prepared for all you may encounter.
Basic Kayak Maintenance Tips
Kayaks are simple machines, but some basic routine maintenance will make yours last longer. Here are some good tips on taking care of your boat. Plastic kayaks are a good choice for low-maintenance paddling, but they too require a little TLC.
Due to your cookie choices, we cannot show you this content. Adjust your settings?
Store Your Kayak Properly
One of the best things you can do is store it properly. A cool, dry place like a garage is ideal. Storing it on its edge is best; this can help prevent “oil canning.” The NRS Kayak/SUP Hanger is ideal—it holds the boat on its edge and keeps space below it available for other storage.
If you must store the boat outdoors, turn it upside down or use a cockpit cover to keep moisture out. Cover it or keep it in a shady place to prevent sun damage. Long-term exposure to the sun can cause considerable damage to the boat. You can also apply 303 Aerospace Protectant, an excellent sunscreen material, to the hull.
Keep It Clean
Rinsing the kayak with fresh water after each outing is a good idea. This is particularly important when boating in saltwater. Pay particular attention to items with metal parts, like rudders, foot pedals, and backbands.
Plastic kayaks can stand up to quite a bit of abuse. One thing that’s fairly common with them is warping or deforming of the hull. When this happens, usually setting it out in the sun on a hot day will cause it to pop back out to its original shape.
Repair As Needed
Superficial scratches and gouges in plastic kayaks aren’t usually a problem, but hit hard enough and the plastic can crack or puncture. The polyethylene in plastic boats resists most adhesives, but G/flex Epoxy Adhesives adhere just fine. Follow the linked instructions for strong, permanent repairs. G/flex also works great for repairs to fiberglass and composite kayaks.
How to Paddle a Tandem Kayak
The tandem, or “double” kayak, can be a great choice for your paddling adventures. The tandem offers some significant advantages over a single kayak. Most importantly, it lets two people get out on the water while enjoying time together!
Due to your cookie choices, we cannot show you this content. Adjust your settings?
It also lets you safely take someone out who has less skill or strength, or even someone who doesn’t want to paddle and just wants to be a passenger. It’s a great vessel for introducing a new person to the great sport of kayaking.
Benefits of a Tandem Kayak
Recreational tandems tend to be wider, offering more stability for the beginner. Touring tandems can also be wider, and they’re also longer. A longer kayak tends to be more streamlined, so it will be faster through the water. A longer boat also tends to track straighter, and many touring kayaks have rudders or skegs for improved tracking.
In addition to having more room for people, tandem boats give more storage for gear and make great multiday craft for a single paddler. All that additional room lets you pack the extra goodies that make for luxurious camping.
Tandem Kayak Paddling Tips
Place the more skilled and stronger paddler in the back. From there they can better control the direction of the boat and coordinate their strokes with the person in front. It takes some time and patience for two paddlers to get synched for efficient travel; there’s a reason the tandem is sometimes called “the divorce boat.”
That patience pays off; two paddlers working together can go faster, with less effort, than a solo boater. When they coordinate strokes, they can turn the boat on a dime, much quicker than a solo paddler.
Kayaking for Fitness: Benefits and Beginner Tips
If you’re looking for a great upper body workout, kayaking can’t be beat. Vigorous paddling exercises the back, abs, and arms, all while you’re in a much more beautiful setting than a gym.
Due to your cookie choices, we cannot show you this content. Adjust your settings?
Kayaking as Exercise
Kayaking for fitness started getting increased recognition as adventure racing became more popular. Many of the races have a kayaking leg, so more and more people began training in kayaks. It didn’t take long for folks to realize that kayaking provides a great alternative, and complement, to other aerobic fitness activities like running and biking.
Kayaking doesn’t have the lower body pounding that jogging or running delivers, so it’s also a great activity for anyone who has hip or knee problems. And since it’s one of the few outdoor activities that focuses on the upper body, it provides a good balance to your exercise routine and helps avoid some of the common overuse injuries.
Things to Consider if You’re Just Starting Out
For fitness paddling, any boat will do the trick. However, a narrower boat will glide through the water more smoothly and allow you to go faster. That’s not a great advantage for fitness unless you’re racing, and the narrower the boat, the less stable they are. There are great buys out there that the beginning fitness paddler can take advantage of, and all you need is the boat, a paddle, and a good life jacket.
Check with your local paddling shops or paddling clubs to see if there are organized fitness paddling events in your area. Some groups hold regular races. These laid-back types of events will give you a good workout and help you meet other outdoor people with similar interests. Having some good paddling partners will help keep you motivated to regularly hit the water!
Kayaking Fundamentals for Beginners: Final Takeaways
Kayaking isn’t something you master in a day, and that’s okay! It’s important to build up your skills and confidence one stroke at a time. Understanding and practicing the fundamentals will give you a strong foundation to build on as you continue to advance your skills as a paddler.
Paddle safe, paddle often, and most importantly, and have fun!
 NRS Gift Card: Always Fits, Always Wanted


