Hypalon Repair Instruction
Learn how to make repairs to your Hypalon raft, cataraft tubes, or your Hypalon raft floors with these detailed step-by-step instructions.
Materials Needed
- Pennel Orca® Tube Material
- Clifton Hypalon® Adhesive
- Clifton Accelerator (Recommended for air holding repairs and for attaching items subject to high stress. See Step 5)
- Pro Roller Hand Tool
- Toluene
- Stiff Bristle Brush – 4-ounce can has a brush in the lid.
- Chemical Resistant Gloves (i.e. Nitrile gloves)
- Eye Protection
- Pencil
- Fine Sandpaper (~ 180 grit) or Rasp
- Lint-free Towel
- Organic Fume Respirator
Warning for All Glue and Solvent Use
Use of these products can be very dangerous and can have short term and long term consequences to your health. It is important for you to take precautions and wear all appropriate safety gear. Wearing gloves, a respirator, eye protection, and working in a well ventilated area can go a long way towards mitigating these risks.
To ensure a quality repair, read all instructions before beginning.
Instructions
 No matter how careful you are when boating, tears, rips, and holes to your boat can occur. So knowing how to repair your boat, regardless of how big the job, is extremely valuable information to possess. The example shown is a 2" long cut.
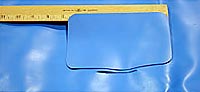
Step 1
Cut the Pennel Orca® Tube Material patch to extend 2" from all sides of the damaged area. This patch is approximately 4" x 6", for a 2" long cut. Make sure to round the corners of the patch. Square cornered patches are more likely to catch and peel than rounded ones.
Step 2
 Trace the area of the patch on the damaged surface with a pencil.
Step 3
 Using 180 grit sandpaper or a rasp, lightly buff the areas to be glued. This includes the damaged area of the boat as well as the backside of the patch. The fabric should look like a dulled version of the normal boat surface. DO NOT buff down to the point where the threads are visible. The goal here is to remove the surface glaze of the fabric, without removing excess coating.
Step 4
 Clean the buffed surfaces with a lint-free towel and Toluene. The Toluene removes any oils, protectants, and sanding particles. It also prepares the surfaces to take the adhesive. Its use is important for achieving a good glue bond.
Step 5
After the surfaces (damaged area on the boat and the underside of the patch) have thoroughly dried from the cleaning step, apply a very thin layer of Clifton Hypalon® Adhesive to both surfaces, using a stiff bristle brush (the 4-ounce can of adhesive has a brush in the lid).
Clifton Hypalon® Adhesive works well as a one-part glue. However, the addition of Clifton Accelerator to the adhesive significantly increases bond strength and chemical and heat resistance. It vulcanizes the rubber and speeds curing of the glue bond. This combination of Clifton Adhesive and Accelerator is what we use in our boat factory for producing NRS Pennel Orca boats. We strongly recommend the mixture for air holding repairs and for attaching anything that will be subjected to high load stress, such as d-rings, carry handles and footcups.
Clifton Accelerator Mixture
1 Gallon/128 oz Glue : 0.80 oz Accelerator
As you can see, very little Accelerator is needed and most of us only need to obtain an ounce of the Accelerator. We supply a precise measuring device and complete use instructions with the Accelerator. Mix only the amount that you will use within four hours. Carefully measure the volumes of Adhesive and Accelerator; using too much Accelerator will actually weaken the repair bond. Mix the two materials in a container that can be discarded later, like a clean metal food can.
Step 6
After the first layer of glue is just tacky apply another very thin second layer of adhesive to both surfaces. Test for "just tacky" with a gloved finger or by touching knuckles to the glued area. The glue should feel gummy, but should not stick to the gloved finger or knuckle. Do not use your bare fingertip to test for tackiness. Fingers contain oils that will be left behind and effect the bonding quality of a repair job.
Step 7
Repeat Step 6, applying a third thin layer of adhesive to both surfaces.
Step 8
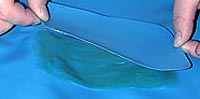 Once the third coat is to the just tacky stage, the two surfaces can be joined. If the adhesive dries beyond this stage, you can reactivate the adhesive by wiping the surfaces to be bonded with a lint-free cloth dampened with Toluene. Join the two surfaces together when the adhesive is tacky to the touch but does not transfer when tested with a knuckle. Be careful with this step. Make sure to place the patch in the correct area. Clifton Hypalon® Adhesive is a contact cement, so once the surfaces have contacted they cannot be moved.
Step 9
 Once the two surfaces are pressed together, apply vigorous pressure with the Pro Roller Hand Tool or roller rasp. Focus on the center of the patch and work outward. Roll every millimeter of patch in multiple directions. This step is important because it forces air bubbles out and helps the two pieces of material bond.
Step 10
Use a lint-free towel dampened with Toluene to wipe up any excess glue expelled from the patch edges while rolling.
Step 11
Allow the patch to cure. Curing times vary due to the different temperatures, humidity, and whether Accelerator was used. The optimal repair environment of above 60°F and below 50% humidity, allows for a curing time of 8 - 12 hours. If at all possible avoid repairs when the humidity is above 70%. When having to make a repair when you’re on a trip, you may not have a choice of weather conditions and optimal cure time. In those cases avoid over-inflating a patched tube and you may need to redo the patch when you get home.
Maintenance
Year round use of 303 Protectant is recommended for all boating gear. Inflatables can use a coat of 303 in between uses, before storage and while sitting in storage.
'%3e%3cg id='Final-Copy-2_2_' transform='translate(1275.000000, 200.000000)'%3e%3cpath class='st0' d='M7.4,12.8h6.8l3.1-11.6H7.4C4.2,1.2,1.6,3.8,1.6,7S4.2,12.8,7.4,12.8z'/%3e%3c/g%3e%3c/g%3e%3c/g%3e%3cg id='final---dec.11-2020'%3e%3cg id='_x30_208-our-toggle' transform='translate(-1275.000000, -200.000000)'%3e%3cg id='Final-Copy-2' transform='translate(1275.000000, 200.000000)'%3e%3cpath class='st1' d='M22.6,0H7.4c-3.9,0-7,3.1-7,7s3.1,7,7,7h15.2c3.9,0,7-3.1,7-7S26.4,0,22.6,0z M1.6,7c0-3.2,2.6-5.8,5.8-5.8 h9.9l-3.1,11.6H7.4C4.2,12.8,1.6,10.2,1.6,7z'/%3e%3cpath id='x' class='st2' d='M24.6,4c0.2,0.2,0.2,0.6,0,0.8l0,0L22.5,7l2.2,2.2c0.2,0.2,0.2,0.6,0,0.8c-0.2,0.2-0.6,0.2-0.8,0 l0,0l-2.2-2.2L19.5,10c-0.2,0.2-0.6,0.2-0.8,0c-0.2-0.2-0.2-0.6,0-0.8l0,0L20.8,7l-2.2-2.2c-0.2-0.2-0.2-0.6,0-0.8 c0.2-0.2,0.6-0.2,0.8,0l0,0l2.2,2.2L23.8,4C24,3.8,24.4,3.8,24.6,4z'/%3e%3cpath id='y' class='st3' d='M12.7,4.1c0.2,0.2,0.3,0.6,0.1,0.8l0,0L8.6,9.8C8.5,9.9,8.4,10,8.3,10c-0.2,0.1-0.5,0.1-0.7-0.1l0,0 L5.4,7.7c-0.2-0.2-0.2-0.6,0-0.8c0.2-0.2,0.6-0.2,0.8,0l0,0L8,8.6l3.8-4.5C12,3.9,12.4,3.9,12.7,4.1z'/%3e%3c/g%3e%3c/g%3e%3c/g%3e%3c/g%3e%3c/svg%3e) Your Privacy Choices
Your Privacy Choices NRS Gift Card: Always Fits, Always Wanted


